Wednesday, December 18, 2013


The next time you come home with a stockpile of candy cane from the Santa Claus parade, make sure to save most of them for this excellent recipe. With just slight alterations, this biscotti recipe (adapted from The Farmstead Chef) is great to make during the holidays. I reduced the sugar, made them miniature and omitted the crushed candy-cane topping to make them less sweet but delectable with coffee. Your friends will love you even more!


Mini Candy Cane Biscotti (about 4 dozen)

1 1/2 sticks salted butter
1/2 cup sugar
3 organic eggs
2 tsp peppermint extract
3 1/4 cup organic flour
1 tsp baking powder
1/2 cup crushed red, white and green candy canes
melted white chocolate for drizzling


In a large bowl, use mixer to cream butter and sugar together. Beat in eggs one at a time.


© 2013 jordanabananabakes.blogspot.ca


Add peppermint extract and mix well. In a separate bowl, mix flour and baking powder together. Mix crushed candy canes in with the flour. Slowly add flour mixture with the egg/butter mix and beat until blended (dough will be stiff).


© 2013 jordanabananabakes.blogspot.ca


Divide dough into four. Roll each ball into a log (about 14-inches-by-1 1/2-inches). Space 2 logs on a baking sheet topped with parchment paper and bake at 350°F for 30 minutes. Cool for 15 minutes. Place cooled logs on cutting board, and with a serrated knife, cut at an angle into 1/2-inch pieces.


© 2013 jordanabananabakes.blogspot.ca


Place cut side down on the baking sheets (you can use the same parchment paper) and bake for 12 minutes until golden around the edges. Let cool, then drizzle white chocolate over the cookies. Happy Holidays!


© 2013 jordanabananabakes.blogspot.ca


© 2013 jordanabananabakes.blogspot.ca

Thursday, November 28, 2013


Tapenade. Not my favourite word, Tapenade.

And it has a reputation of being a bit la-di-da.

A long time ago, I tried store-bought, black olive tapenade.

Bleh.

I like green olives much more anyway.

Then I found a recipe by Eugenia Bone from her book, Well-Preserved.

I read how simple it is to make Green Olive Tapenade in a food processor.

I adapted the recipe to what I had. My can of green olives was nothing fancy, but I had the power of fresh herbs. And sea salt. And Fresh Ontario garlic. Plus a bright yellow lemon. Yellow lemon yellow lemon...

It is time to rid the reputation!

Green Olive Puree (ok, fine, “tapenade”) is an excellent base for pizza. I recently put a dollop in Jamie Oliver’s Superb Squash Soup and it was heavenly. I used it to top large croutons with Parmesan and served them as yummy appetizers.  Here are even more brilliant ideas, the first from Ms. Eugenia herself, check it out:


So here is my easy recipe for a top-notch, green olive (insert unfavourable word here).


Top-Notch Tapenade

1 can pitted green olives, drained
2 tsp drained capers
2 large garlic cloves, peeled and crushed
3 Tbsp olive oil, or more to taste
2 Tbsp fried sage leaves (about 6)
2 Tbsp fresh rosemary leaves
2 Tbsp fresh parsley
3 Tbsp fresh lemon juice
1 Tbsp lemon zest
1 Tbsp sea salt
Freshly ground pepper, to taste
½ tsp paprika


Place all ingredients in a food processor. Grind to a paste. Place in a small clean mason jar and put just enough olive oil to cover the top. Cover and refrigerate up to 1 week. Add more olive oil if needed.


© 2013 jordanabananabakes.blogspot.ca


© 2013 jordanabananabakes.blogspot.ca


© 2013 jordanabananabakes.blogspot.ca


© 2013 jordanabananabakes.blogspot.ca


© 2013 jordanabananabakes.blogspot.ca


Tuesday, October 29, 2013


My blog is just a baby banana compared to the food blogs of plenty out there. Still, I am proud that Jordana Banana Bakes and Nika Tortilla Travels are one year old this month. Happy Anniversary to us!

Some facts about JBB and NTT:
-I use a Canon PowerShot SX110 IS compact digital camera.
-the blogs are named after my two girls.
-I like simple and delicious recipes that I tweak to make it my own, including the name.

Because it's our anniversary, it is imperative that our granola this month is tossed with banana (chips). And crunchy peanut butter. An Elvis version of granola if you will. Aloha Granola? Amazing Grae-nola? A Little Less Conversation and a bit more of this granola? How about Viva Granola. Yup, I like that. And you will LOVE this.

Viva Granola (Peanut Butter and Banana Chip)

4 cups quick-cooking rolled oats
1 cup unsweetened shredded coconut (optional)
1/2 cup toasted pecans, broken by hand (optional)
20 banana chips or more, broken by hand
1 tsp cinnamon
½ cup vegetable oil
½ cup maple syrup (or honey)
½ cup organic crunchy peanut butter (no sugar, salt or preservatives added)
½ cup Thompson seedless raisins

Preheat oven 325°F.

Line a large baking sheet with parchment paper. Set aside.

Combine oats, coconut, half of the banana chips and cinnamon.


© 2013 jordanabananabakes.blogspot.ca


© 2013 jordanabananabakes.blogspot.ca


In a separate bowl, combine oil, maple syrup (or honey) and crunch peanut butter and gently mix together.

Pour liquid ingredients in with the dry ingredients and gently fold together until coated. Spread evenly on baking sheet.


© 2013 jordanabananabakes.blogspot.ca


Bake for 45 minutes, gently stirring every 15 minutes. Turn off oven and leave the baking sheet in the closed oven for an additional 30 minutes. Remove from oven and let cool on a wire rack. Stir in remaining banana chips, raisins and pecans if using.


© 2013 jordanabananabakes.blogspot.ca


Store in a large mason jar with lid or airtight container at room temperature for 2 weeks. Snack on its own or with your favourite yogurt while watching this:
http://www.youtube.com/watch?v=ucubLr3ZLbw


© 2013 jordanabananabakes.blogspot.ca

Inspired by copious amounts of granola and granola recipes in my lifetime. © 2013 

Friday, September 20, 2013


Change #1: Both our girls are now in school full-time.
Change #2: I am now working part-time at a local farm market bakery.
Change #3: The leaves.
Change #3: Blueberry baking now shifts to apple.

These new yet uneasy transitions call for an easy-breezy autumn pie.
I call this Transition Pie.

It is a delicious open-faced blueberry and silken apple pie. Open-faced. Open...to change.


© 2013 jordanabananabakes.blogspot.ca


Blueberry and Silken Transition Pie

For the Quick Crust: (modified from Christy Jordan’s Southern Plate) 
1 ½ cups all-purpose flour
1/2 tsp salt
1 ½ tsp sugar
2 Tbsp milk
½ cup vegetable oil


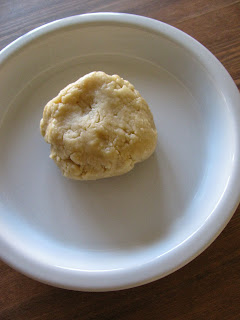
Mix the flour, salt and sugar in a large bowl. Add milk and drizzle oil while mixing with a whisk. Pat out to fit into pie plate. Makes 1 pie crust.


© 2013 jordanabananabakes.blogspot.ca


© 2013 jordanabananabakes.blogspot.ca


For my Transition filling:
4 cups frozen blueberries
2 Silken apples, grated with juice (or use your fave apple)
2 Tbsp lemon juice
1 tsp grated lemon rind
½ cup sugar
2 Tbsp tapioca flour/starch
1 tsp cinnamon
½ tsp allspice


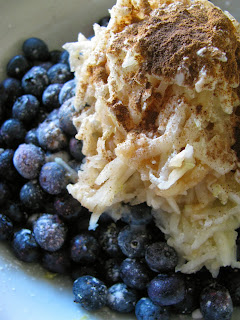
Toss ingredients together in a large bowl. Fill pie crust.


© 2013 jordanabananabakes.blogspot.ca


Preheat oven 425°F. Bake pie on middle rack for 20 minutes. Remove pie from oven and reduce heat to 375°F. Cover the top of pie with foil (be careful not to burn yourself) and place pie on a cookie/baking sheet to catch overflow of juice. Place back in oven and continue baking for another 45 minutes, until fruit juices are thick and bubbly and the blueberries are still relatively holding their shape. Let rest on wire rack for two hours before cutting. Savour on its own or with a sprinkling of icing sugar, a dollop of ice cream or fresh whipped cream.


© 2013 jordanabananabakes.blogspot.ca

Thanks to my friend Olive, for lending me her copy of The Gourmet’s Canada by Sondra Gotlieb (1972). Her recipe for Deep Blueberry Pie generated the Transition. © 2013 

Thursday, August 29, 2013


If you're looking for a super-simple, end-of-summer side dish, here is what I call The Best of Summer Veggie Bake.

Before you look at what vegetables are on your counter and even before you look in your fridge, you have to close your eyes and think about three (or more) amazing things you experienced this summer. (long pause in waiting)...Well, how lucky you are! I too am blessed, for I had a summer in which the generosity of family and friends abound.

In the matter of veggies, we are blessed with this ginormous zucchini from our lovely neighbors. We in turn made them our Ultimate Banana Zucchini Chocolate Chip Muffins (another neighbor who just gave us Bartlett pears from his garden will most likely get the same). With all this zuke, I'm thinking about making a Giant Stuffed Zucchini, Zucchini Pickles...so yes, there's a whole lotta zucchini going on here, and of course this summer squash will make it in The Best of Summer.

My mom gave my daughters several plants of cherry tomatoes, which they like to pick and pop in their mouths in the same second. They are sweet and slightly tough skinned and I will miss them when they go. But first, they'll also go into The Best of Summer.


© 2013 jordanabananabakes.blogspot.ca


Last but not least, super-sweet Peaches & Cream corn from the Town of Tecumseh (which hosts the famous Tecumseh Corn Festival) made it into The Best of Summer also. "Sweet Corn?" the girls exclaim. Yes, of course- how could they remember that I brought home the famous sugary-sweet corn? When for them, being showered with parade candy was the sweetest.


The Best of Summer Veggie Bake (use veggies to your liking)

2 1/2 cups cooked then cooled (or leftover) white or brown rice
2 1/2 cups chopped zucchini, or if grated, drained
1/2 onion, minced
2 cloves garlic, minced
2 Tbsp oil + 1 Tbsp butter
2 tsp sea salt, divided
freshly ground pepper
juice of half a lemon + 1 Tbsp lemon rind
1-2 stalks scallions, green parts only, chopped
1/2 cup of mixed fresh garden herbs, chopped fine (optional)
1/2 cup sour cream, full or low-fat
12-15 sweet cherry tomatoes, whole or cut in half
1 cup blanched, sweet corn kernels
1 cup grated Pecorino Romano, Parmesan or White Cheddar, divided

Grease a square glass baking dish and set aside. Preheat oven at 350°F.

In a large bowl, mix together the cooled rice, sweet corn, sour cream, chopped scallions, fresh herbs if using, lemon rind, 1/2 cup of your choice of cheese, and 1 tsp. of the salt and pepper and set aside.

In a medium frying pan, heat oil and butter on medium-low heat, then add minced onion and garlic and cook until softened. Add chopped (or grated) zucchini on top of onion/garlic mixture, then squeeze juice of half a lemon on top. Sprinkle 1 tsp. salt and add pepper. Increase to medium-high heat and cook until just tender, about 4-5 minutes (if it's grated zucchini, you can then add the cooked zucchini to the rice and toss gently, or alternatively you can also toss the cooked, chopped zucchini in with the rice (here, I placed my rice in the glass dish first, spreading the rice evenly on the pan, and then I added the zucchini/onion mix on top of the rice).


© 2013 jordanabananabakes.blogspot.ca


© 2013 jordanabananabakes.blogspot.ca


With a spatula, spread the rice mixture evenly in your baking dish. Top the rice with your zucchini mixture (if you chose to not mix it in with the rice) and place the whole or halved cherry tomatoes on top. Sprinkle the remaining cheese and bake for 25 minutes. 


© 2013 jordanabananabakes.blogspot.ca


Serve as an accompaniment to sausages, fish or chicken. Enjoy!


© 2013 jordanabananabakes.blogspot.ca


Saturday, July 20, 2013


36°C.

Too. Hot. To. Bake. 

This recipe is so cool.

I'm sure you have about twenty ladyfingers left over from the last time you made Tiramisu.

I'm sure you have about one pint of vanilla ice cream from the last time you made a crumble.

I'm sure you have about two cups of frozen strawberries from when you went picking with the kids.

And I'm sure you have about one cup of heavy cream left over, from that luxurious pasta dish you made last night.

There you are: No-Cook, No-Bake, No-Fuss, Ice Cream Tiramisu.


Ice Cream Tiramisu

20 Savoiardi or Ladyfinger Biscuits
1 pint (2 cups) vanilla ice cream, melted
2 cups frozen strawberries
1 cup heavy (whipping) cream
2 Tbsp icing sugar (for whipping cream)


Leave ice cream (I had about 2 cups of leftover ice cream in this container) on the kitchen counter until melted (about 30-45 minutes).


© 2013 jordanabananabakes.blogspot.ca


Puree frozen berries in blender until it resembles sorbet in texture.


© 2013 jordanabananabakes.blogspot.ca


Line a 9 X 13 glass baking dish with the biscuits (breaking two or three ladyfingers in half to fit if necessary).

Pour the melted ice cream over ladyfingers. 


© 2013 jordanabananabakes.blogspot.ca


Spoon the berry puree on top and spread evenly over biscuits.


© 2013 jordanabananabakes.blogspot.ca


Cover dish with plastic wrap and refrigerate for 4 hours or overnight. 

Just before serving, using an electric mixer, whip cream with icing sugar until soft peaks form. Serve berry biscuits (now a soft, cakey texture) with a spread or dollop of fresh whipped cream. 


© 2013 jordanabananabakes.blogspot.ca

Recipe adapted from William-Sonoma: Easy Entertaining


Tuesday, June 25, 2013


For our friend's 30th birthday, my girls and I decided to throw an outdoor Pink Party.

Pink dresses, pink hats, with pink food and ambiance of course.

Chocolate Cake with Double Berry Mousse was la pièce de résistance.

It was, as my bookworm daughter would say, “Pinkalicious!” 

It is a dense, moist chocolate cake, and in the middle, raspberry compote and fresh strawberries folded in whipped cream. It is the most scrumptious introduction into thirty that I could think of.

Thirty can be this delicious! Happy Birthday Lindsey.


© 2013 jordanabananabakes.blogspot.ca


Chocolate Cake with Double Berry Mousse

For the Double Berry Mousse filling:
2 cups fresh raspberries
1/2 cup sugar
2 Tbsp cornstarch
1/4 cup water
1 cup whipping cream
1 Tbsp icing sugar
1 cup fresh strawberries, diced

In a medium pot on medium heat, cook raspberries until it just starts to bubble. Add the sugar and stir to dissolve. In a small bowl, mix cornstarch with water until incorporated, then stir it into the raspberry mixture until thickened. Take off heat, cool about 30 minutes then refrigerate for two hours or until chilled.

Whip cream with icing sugar until stiff. Fold 1/2 to 1 cup of chilled raspberry compote into whipped cream (save leftover raspberry compote for ice cream or more whipped cream mousse for another day's dessert). Fold in diced fresh strawberries. Keep in fridge until ready to fill cake.


© 2013 jordanabananabakes.blogspot.ca


For the Chocolate Cake:
2 cups organic all-purpose flour
1 tsp baking powder
pinch of salt
1/4 tsp baking soda
1/2 cup raw cocoa powder, such as
1 cup sugar
1/2 cup butter
1 cup buttermilk
1 tsp vanilla extract
2 organic eggs

For the Chocolate Frosting:
2 cups whipping cream
8 oz Lindt Piccoli semi-sweet couverture wafers

Preheat oven to 350°F.

Sift dry ingredients in a medium bowl. In a separate large mixing bowl and with an electric mixer, whisk the butter and vanilla together. Whisk in the eggs, one at a time, until incorporated. Add a third of the flour mix into the butter mix and whip for 1 minute, then add 1/2 of the buttermilk and whip for 1 minute, alternating between the flour and buttermilk, ending with the flour mix. Make sure all the flour is scraped from the sides and are incorporated.


© 2013 jordanabananabakes.blogspot.ca


Line two round 9" baking pans with parchment paper. Divide the mixture between the two pans, smoothing out the tops. Bake for 25 minutes or until cake tester comes out clean. Remove from oven and let cool in the pans for 10 minutes, then turn onto a wire rack. Gently remove parchment papers and let cool. 

In the meantime, make the frosting. In a medium saucepan, combine the whipping cream and chocolate. Gently stir over low heat, until chocolate has melted and the mixture has become shiny and smooth. Let cool.

Once the cakes are cooled, place a cake layer on a parchment sheet that is on top of a cookie sheet with sides (to catch the runny icing). Top the first cake layer with the Double Berry Mousse and spread evenly. Place the second chocolate cake layer on top of the mousse. Before pouring the frosting on top of the whole cake, beat it for two minutes, then pour onto the center of the cake and allow it to drip down the sides, making sure it covers the whole top of the cake and the bottom sides. Let frosting set- about 15 minutes. Gently lift cake from parchment, trying not to touch the top of the cake, and place on a decorative cake platter. Top with freshly cut roses (minus the thorns) or other edible flowers.


© 2013 jordanabananabakes.blogspot.ca


© 2013 jordanabananabakes.blogspot.ca

Chocolate Cake adapted from Darina Allen's Forgotten Skills of Cooking

Wednesday, May 29, 2013


I am clearing out my freezer to make room for this summer’s bounty. Fresh rhubarb is now here, but I am determined to use last year’s frozen stash. How about stewed rhubarb? My recipe makes a nice batch, so I decided that half of it would be solely for scooping and eating (maybe one serving with a giant dollop of vanilla yogurt) and the other half would be for the middle layer in a cake. A cheesecake. Rhubarb cheesecake. My seasonal take. 

Rhubarb Cheesecake

For the stewed rhubarb:
3 cups frozen rhubarb
½ cup sugar
2 heaping Tbsp strawberry jam

Cook first 2 ingredients in a pot over medium-high heat, uncovered, for 15-20 minutes until thickened and pulpy. Take off heat and swirl in strawberry jam. Let cool or refrigerate overnight.

For base:
1 cup butter, room temperature
½ cup sugar
1 tsp vanilla
pinch salt
1 egg
1 ¼ cup flour
1 tsp baking powder

For filling:
1 ½ cup cream cheese
300g container ricotta cheese, drained
½ cup sour cream
1 tsp vanilla
2/3 cup sugar
4 eggs
¼ cup cornstarch
2/3 cup melted butter


© 2013 jordanabananabakes.blogspot.ca

To make the base, whip butter and sugar together until creamy. Add vanilla and egg. In a bowl, mix flour, salt and baking powder together, then incorporate into the butter mixture. Spread evenly on a buttered 10-inch spring form pan. Dollop spoonfuls of stewed rhubarb throughout the base- do not spread evenly. Set aside. Preheat oven at 375°F.

 For the filling, whip cheeses and sour cream together, then add the vanilla and sugar. 


© 2013 jordanabananabakes.blogspot.ca


Whisk in eggs one at a time, then mix in cornstarch and melted butter.


© 2013 jordanabananabakes.blogspot.ca


Pour filling on top of the rhubarb, making sure the top of the filling is smooth and even. Bake for one hour. While leaving oven door closed, turn off oven and let the cake sit inside for one more hour. Remove from oven and let cake cool completely on a wire rack before cutting.


© 2013 jordanabananabakes.blogspot.ca


© 2013 jordanabananabakes.blogspot.ca


Inspired by Grandma’s German Cookbook

Tuesday, April 30, 2013


My girls love beans. I love that my girls love beans.

Lentil soup, black bean stew, corn and kidney bean salad...and now roasted garbanzos!

Ingenious really, these delicious little morsels. And it's versatile- from snack to side to soup topping, and can turn into a delightful vegetarian main dish. Throughout the years I have found different recipe variations from parent magazines and even Williams-Sonoma does a deep-fried version with garlic, sea salt and sage. Yum!

My version is baked and seasoned with paprika and cumin. Adding olive-oil-fried garlic and coarse sea salt reminds me of my Aunt Arit’s garlic peanuts (ginisang mani) from the Philippines (which would not be the same if I made it here, because both the peanut and garlic varieties are not available in Canada *sigh*).  But both are full of flavour and so addictive...you might just want to make a double batch!

Roasted Garbanzos with Fried Garlic

1 can (19 oz.) garbanzos, rinsed and drained
1/4 cup olive oil + more for frying garlic
1 tsp paprika
1 tsp cumin
1 tsp coarse sea salt
1/2 tsp freshly ground pepper
3-5 small cloves garlic, unpeeled (or more to taste)

Preheat oven to 400°F.

In a large mixing bowl, combine garbanzos with 1/4 cup olive oil, cumin, paprika, salt and pepper.


© 2013 jordanabananabakes.blogspot.ca

© 2013 jordanabananabakes.blogspot.ca

Spread garbanzos out evenly on a rimmed baking sheet lined with parchment paper and roast for 25 minutes, stirring once or twice until golden.

While the garbanzos are roasting, fry the small garlic cloves on medium-high heat until they turn medium-dark brown and crispy, about 1-2 minutes (If you wish to use large cloves, you may cut the hard bottom part and fry them whole with skin on, which will make them slightly on the crunchy side, not crispy, and fry until golden brown. You may also crush the large cloves using a knife with a wide blade: place your knife flat over the clove and with your palm, press down hard on the side of the blade. The skin is now easy to peel off, and at this point you can take off the skin or leave it on, before adding them to the hot oil).

© 2013 jordanabananabakes.blogspot.ca

Transfer the fried garlic to a paper towel-lined bowl to drain. Once slightly cool, peel off skin.

© 2013 jordanabananabakes.blogspot.ca

Transfer roasted garbanzos to a serving bowl, toss or top with the fried and peeled garlic and serve (as a snack, a side dish, sprinkle on hearty soups such as cauliflower or serve on top of basmati rice, quinoa or couscous for a vegetarian main).


© 2013 jordanabananabakes.blogspot.ca